Random Mechanics in The Legend of Zelda: The Minish Cap
How random mechanisms foster motivation and exploration, and how they don't

The Legend of Zelda series is a well-known, and beloved action-adventure franchise focused on real-time mechanics and exploration. However, even if the player's skills are one of the core gameplay elements, other aspects, such as strategy, randomness, and luck, are worthy of attention.
With the recent addition of Game Boy Advanced games in the Nintendo Switch Online Expansion Pack, it is an excellent moment to look back at the Zelda entry for the popular portable console, The Legend of Zelda: The Minish Cap, henceforth TMC.
In this article, we focus on how luck, and random mechanics, are used in TMC from a game design perspective and how these mechanics foster the other elements in the game, such as engagement, exploration, and reward. More specifically, we discuss the mechanics of the Kinstones and the Figurines.
We also discuss how some aspects of these mechanics can lead to a repetitive and monotonous experience when underdeveloped, which serves as a good lesson on how to approach some of these parts differently.
Trading Kinstones and Unlocking Content
Kinstones are part of the Kinstone Fusion mechanic, which consists of matching the player and NPC's Kinstone Pieces. Once the match is done, a fusion happens, triggering an event in the game. These events vary from chests showing up on the map to new passageways and more.
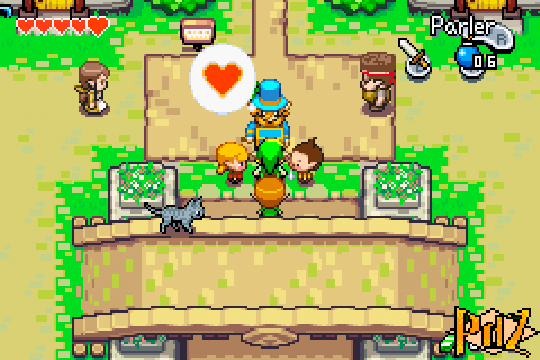
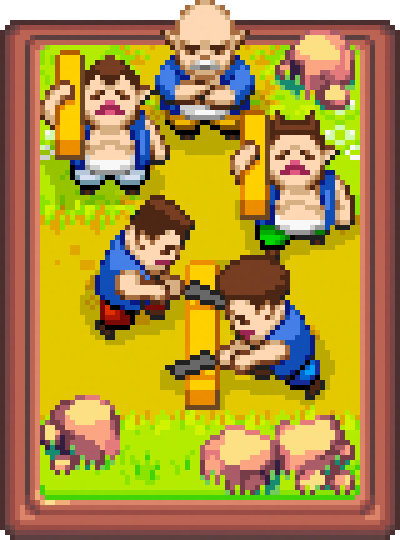
Kinstone Fusion is unlocked when the player first meets with the Hurdy-Gurdy Man and receives the Kinstone Bag. From there on, Kinstones can be found in various places. NPCs that display a floating heart above their heads (as seen in the image below), also known as Fusers, can be engaged to attempt a Kinstone match. The game has many types of Fusers, including regular townsfolk, animals, and even inanimate objects like walls and clouds.
The Kinstones come in 4 colors that match their rarity and utility. Of the four types, three are considered the basic Kinstones (Green, Blue, and Red), which can come in 8 types (3 Green, 2 Blue, and 3 Red).
Green is the more common type of Kinstone and can be found easily by killing enemies or cutting grass. The green variety is very similar to other spoils in the game, which is linked to another typical random mechanism: drop chance. As the player mows grass, breaks vases, and does other usual Zelda mechanics, she can randomly get hearts, bombs, rupees, and for TMC, Kinstones.
In that sense, the Green Kinstone is just another variation of a simple reward. It helps to award the player with basic actions while playing the game in low or no-challenge situations. Mathematically, though, we could also discuss that the green variety can be used to balance the drop rate chances of other elements. However, the Green Kinstones are also connected to the Tingle Siblings quest in the game, which rewards the player with a precious prize.
Blue is a less common type of Kinstone, with a slimmer chance of appearing, but that can be acquired by the same means as the green variety, as well as being found in some chests. The blue variety is very similar to the green one. Still, its higher rarity makes it a better candidate to be seen as a reward for higher challenges and compensation for the player's exploration.
Blue Kinstone events typically have a higher-value outcome. Some lead directly to a Piece of Heart, and others open access to new areas in the game. Moreover, the Blue Kinstones are connected to the Goron quest in the game.
Finally, the Red variation is the rarest of the common Kinstones. They can only be found in chests or bought from NPCs. In that sense, Red Kinstones are a big game reward that justifies the player exploring and uncovering locations to collect them. Their rarity and better rewards nicely balance the experience. For example, some outcomes from a Red Kinstone Fusion are better items, entire Heart Containers, and even unlocking access to new fighting skills.

The Kinstone Motivation Loop
An essential aspect of the Kinstone Fusion is that when a fusion happens, the game shifts the camera to display its event, showing the player what has been changed in the game world. Often, that change is far from the player, which is intentional (and sometimes random).
Since the outcome is far from the player's reach, it motivates the player to go toward it, even if not directly. When a random chest or a new passageway shows up, it immediately triggers our curiosity about what it contains or where it leads. It is similar to a Goal-Achievement-Reward cycle, in which the player engages a goal and, after achieving it, is rewarded for the effort.
The general Kinstone Motivation Loop mechanic can be exemplified below:
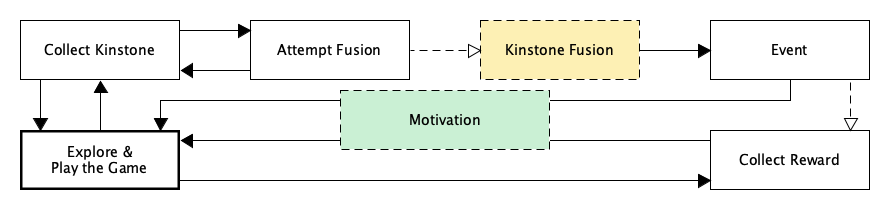
As the player explores and plays the game, some Kinstones are collected. Successful fusions trigger events that unlock rewards and encourage players to continue exploring and playing. When the player sees fit, she will collect the unlocked rewards, triggering more motivation and returning to the initial state of play.
The game's main storyline emphasizes this mechanic. As the player progresses through the story, enemies will be fought, and chests will be found, which can all serve as Kinstone collection events. As the player returns to the city or meets new townsfolk in the game, more fusers are met for potential Kinstone fusions, which will trigger the motivation loop again.
The Gold Kinstones of Progress
As stated before, there are four types of Kinstones, but we only mentioned three. The fourth kind, the Gold Kinstones, is tied to the game's storyline. There are only 9 of them, and they are required to progress through and finish the game. Besides the difference in how you collect the gold variety, all other aspects are equal to regular Kinstones, including the motivation loop.
In that sense, they serve as mechanisms to approach the Kinstone mechanics within the game's core gameplay loop. The Gold Kinstones legitimatizes the Kinstone collection and fusion aspects as an integral part of the experience. Without them, the playthrough is not complete.
Moreover, from a tutorial or educational point of view, the golden variation forces the player into performing Kinstone Fusion, which, up to their first use, was only mandatory once (in the first encounter with the Hurdy-Gurdy Man). Thus, it enforces how the mechanic is done and its impacts. They act as a good reminder and assessment of the player's knowledge of the game's systems.
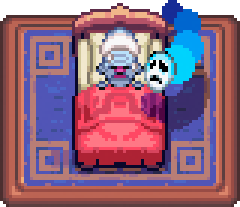
Figurines, Mysterious Shells, and Repetitiveness
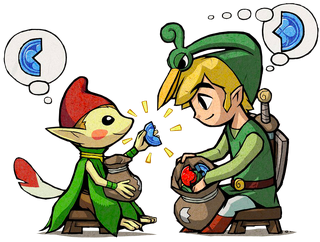
By the time the player reaches the first Gold Kinstones, it is possible to unlock another random mechanic in TMC, the Figurine Gallery. The gallery works with a random mechanic where the player must spend Mysterious Shells, another in-game currency, for Figurines.
Mysterious Shells are somewhat similar to Blue Kinstones. They can be found inside the overworld's treasures, bushes, and rocks. Some Kinstone events also lead to chests with many shells as part of the event's reward. The Mysterious Shells are then used up to draw a chance of getting a Figurine. As the player collects Figurines, more shells are required to unlock new ones and avoid duplicates. There are 136 total Figurines in the game, some of which are only available after defeating the final boss.
Figurines are simple objects that display characters, enemies, and situations from the TMC universe. They are compiled and can be browsed in the Figurine Gallery. The Figurines' art, just like the game's overall art style, is remarkable.
Different Rewards and Chance
Regarding the game system and how they are placed in the game, I could even argue that Mysterious Shells are regarded with some high value. They are often encountered in places in which you would expect a Red Kinstone or better, even if, on those occasions, they are found in bunches. Yet, the only reward you get from the shells is transforming them into Figurines.
As stated previously, Figurines do not directly interfere with the game. If you disregard the post-game, then, for a fact, Figurines can be ignored entirely, as they have no means of truly impacting the gameplay.
In that sense, the Figurine and Mysterious Shells mechanics differ greatly from the Kinstones regarding cohesion to the game and intrinsic reward. Figurines are pure cosmetics that serve no goal beyond themselves. Their only purpose is being gathered. Kinstones and their events, on the other hand, immediately impact the gameplay and the player's capacities.
Moreover, the Figurine Gallery mechanic has slow animations and depends purely on chance, which can quickly get frustrating. It does take quite some time to go through the ordeal of spending shells, drawing a Figurine, opening it, and then repeating the process. It is also not possible to perform it in bulk, opening many Figurines at once.
The nail in the coffin lies on another aspect connected to the Mysterious Shells: the player is limited to simultaneously carrying up to 999 shells. Although it sounds like a significant number, a regular playthrough can easily surpass it. New shells acquired once the capacity is reached are destroyed.
With that, a player who decides to spend her shells after beating the game is bound not to have enough of them, while many were destroyed due to the maximum capacity and cannot be collected again.
Alternatives and Lessons
From a game design perspective, it is possible to discuss how these mechanics could have been better incorporated, especially if we take inspiration from how the Kinstones were used:
- Drop Rate and Chance: Drawing from how the three common Kinstones vary on their drop rate, chance, and location, the Mysterious Shells and Figurines could be split into more groups to better cover a broader range of difficulty and motivation. Boss Figurines, for instance, could require either a specific type of shell or stand in a different tier in the Figurine Gallery. That would also allow players to find more intrinsic value in collecting the Figurines that have a personal value, rather than a randomized collection.
- Cohesion with the Campaign: The Figurine Gallery is located in the corner of Hyrule Town, which is not an obvious location and can be easily missed in a playthrough. To not mimic Kinstones too much and make Figurines necessary to progress, the placement of the Figurine Gallery could be changed to have a more central role in the narrative. Moreover, there could be more Figurine Galleries throughout the game, enforcing the sense of exploration and allowing the player to spend her shells occasionally. Even further, Kinstone events could be used to unlock those galleries, combining the mechanics and reinforcing the motivation loop.
- Increased Reward Value: Figurines are pure cosmetics but do not need to be so. They could be tied to other mechanics in the game and influence the narrative more directly, even if that is in minimal ways. For example, Figurines could provide rupees when first acquired, or duplicates could be sellable. Money is not usually a significant factor in the Zelda franchise, but it can be decisive in earlier moments of the game. Adding such a mechanic could help, from an early stage, engage the player in the Figurine collection, even if their goal is other than gathering them.
- Faster Iterations to Reduce Repetition: Although the Kinstone fusion animations are not short either, the Figurine-Dispensing Machine is very slow. It makes sense for dramatic purposes, but it quickly gets old. A faster iteration or even being able to skip the animation would greatly benefit the game. Besides that, other options, such as bulky trading shells, could help players not hoard their mysterious shells.
Indeed, some of these changes could not work or even destabilize part of the gameplay. Additions are often the source of the game imbalance, even when meant to improve the overall experience. There are also other ways to tackle some of these elements, such as exploring multiplayer features for Figurine trading or connecting them to the Fairy Fountain mechanics.
Moreover, some players might have fun with the Figurines and Mysterious Shells as they are. After all, even if we can spot flaws in their design, they are not harmful to the overall experience. Different people engage and find motivation in many places and aspects of games that we cannot always foresee.
From a game design perspective, it is always an excellent exercise to see how these mechanics trigger engagement, exploration, and motivation. A simple random chance can foster a long chain of mechanisms that feeds back upon itself, boosting the player and creating more venues for investigation. Furthermore, cosmetic items often used to move the in-game's economy and increase the overall player time for completionists can produce exciting gameplay using cohesion techniques and fair drop chances.
Thanks for reading 😊. You can join me here if you want to know more about me and my work.
Comments
Sign in or become a SUPERJUMP member to join the conversation.